14 FLIR Secure: Connecting to the DVR Using a Mobile Device
You can view video from your security cameras on compatible smartphones and tablets from anywhere in the world over the Internet.
Our new systems feature remote access with our free FLIR Secure app, which provides hassle-free remote access that is secure, reliable, and easy to set up.
To use the FLIR Secure app:
- Download and install the free FLIR Secure app from the App Store or Google Play Store.
-
Tap the FLIR Secure icon (
 ) to open the app.
- Tap SIGN UP, then enter your email address and password to create a new account.
-
Tap
 , then tap Security System.
- Use the camera of your mobile device to scan the QR code on top of your recorder.
- Enter the recorder’s user name (default: admin), and your secure password. Tap Done.
- The app displays all the cameras that are connected to your recorder on the home screen. Tap any camera to stream live video from it.
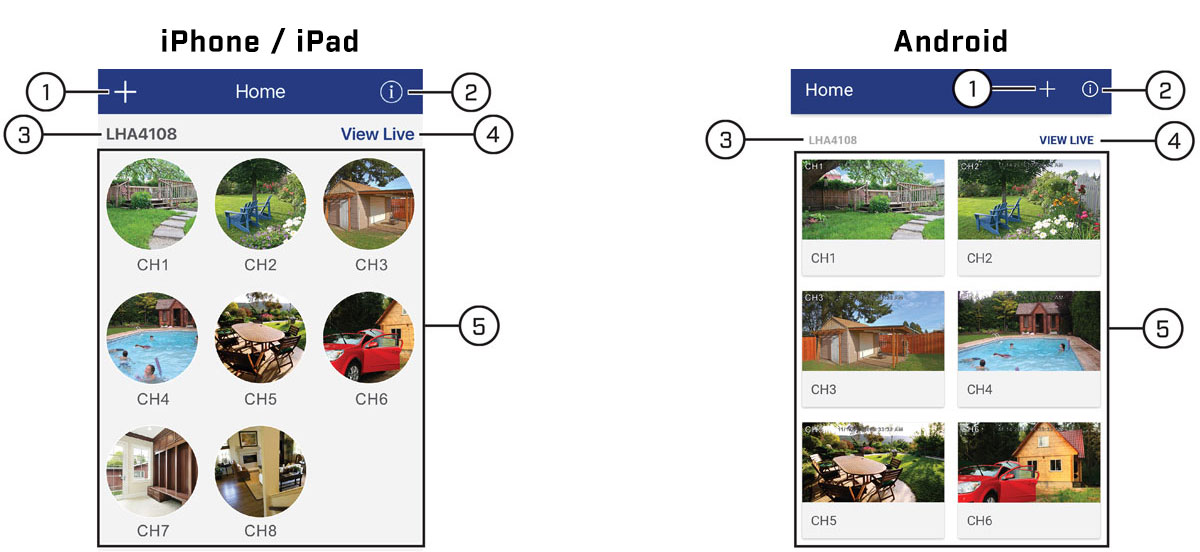
14.1 FLIR Secure Interface
FLIR Secure Home Screen
-
: Tap to add new devices or create new groups.
-
 : Tap to view the FLIR Secure app information. You can also log out from the FLIR Secure app in this screen by tapping Log Out.
- Device Name / ID
- View Live: Tap to stream live video from all connected cameras. Tap (hold for one second) and drag a camera channel to rearrange it.
- Camera Channels
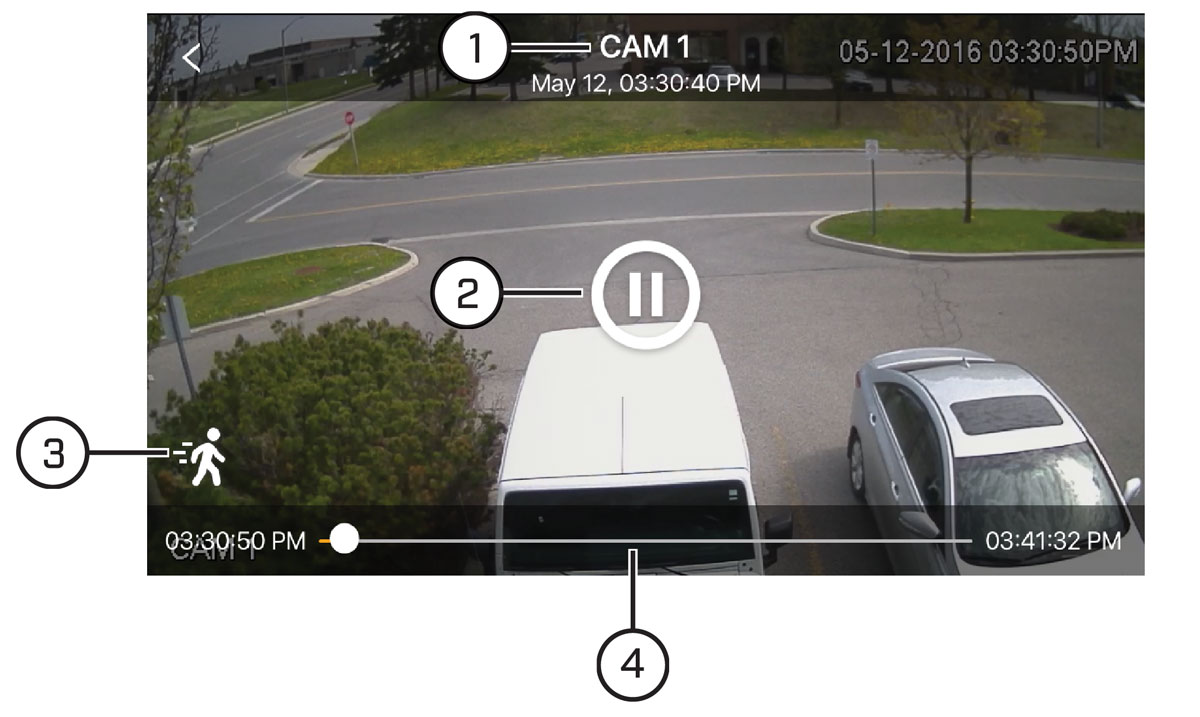
Single-Channel Live View
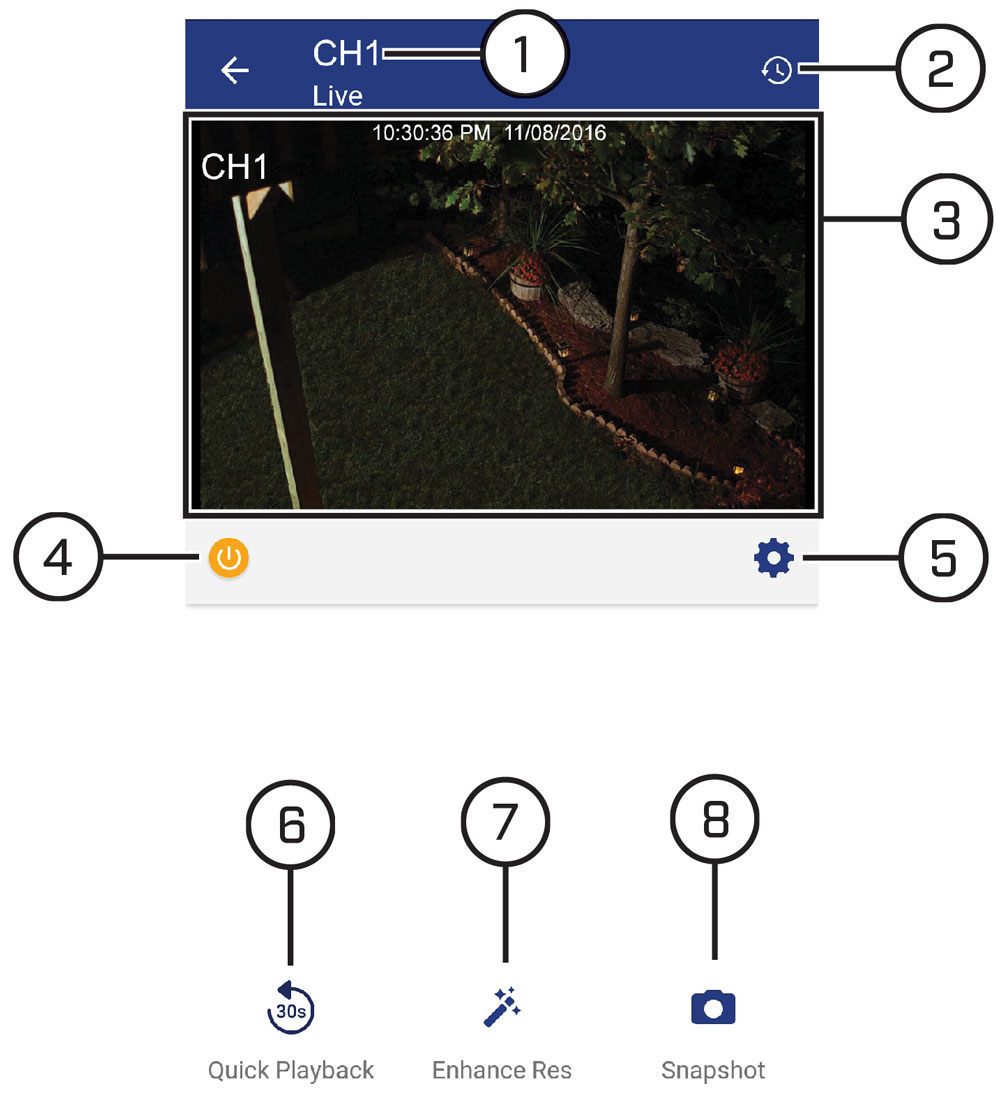
- Channel Number / Name
- History: Tap to view recorded videos saved on your recorder’s hard drive.
- Live View: Double-tap to zoom in. Turn your mobile device sideways to view in landscape mode, or hold upright to view in portrait mode.
- Disconnect: Tap to disable live video, video recording, and push notifications. Tap again to enable the disconnected camera.
-
 : Tap to open channel settings for the selected camera channel. You can change the channel name, enable PTZ controls (for
PTZ cameras only), enable camera’s microphone (for audio-enabled cameras only), and enable motion detection notification
for the selected camera channel. Tap Save after you make your changes. On the channel settings screen, swipe to the bottom of the screen and tap DEVICE SETTINGS to view your device information. You can also change the device name, enable / disable mobile notifications for your device,
enable / disable device error notifications, and check the Cloud subscription plan for your camera channels.
: Tap to open channel settings for the selected camera channel. You can change the channel name, enable PTZ controls (for
PTZ cameras only), enable camera’s microphone (for audio-enabled cameras only), and enable motion detection notification
for the selected camera channel. Tap Save after you make your changes. On the channel settings screen, swipe to the bottom of the screen and tap DEVICE SETTINGS to view your device information. You can also change the device name, enable / disable mobile notifications for your device,
enable / disable device error notifications, and check the Cloud subscription plan for your camera channels.
- Quick Playback: Tap to play back video from the last 30 seconds for the camera channel. Tap anywhere on the video to pause / play the playback.
- Enhance Resolution: Tap to enhance the resolution of the camera image.
- Snapshot: During single-channel live view and quick playback mode, tap to take a screenshot of the currently-selected channel. Your mobile device must be in portrait mode.
14.2 Creating Groups
Group multiple cameras from various devices using FLIR Secure. You can then quickly bring up the selected group of cameras in live view without having to select each camera individually.
-
From the home screen, tap
.
-
Tap CREATE GROUP. The FLIR Secure app displays all cameras that are connected to your FLIR Secure account.
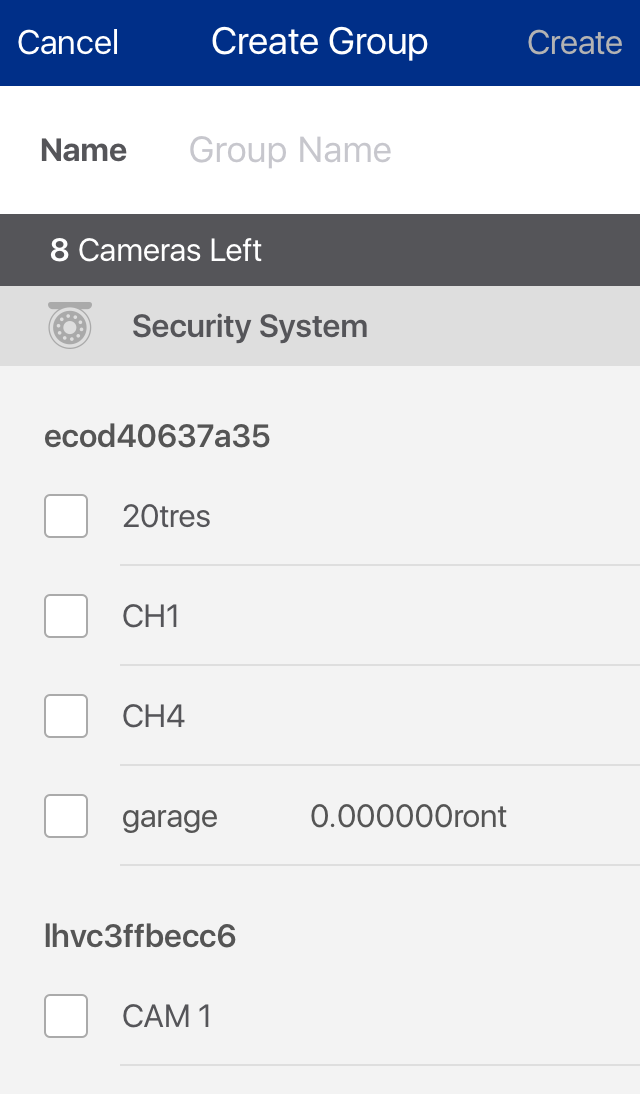
- Tap the Name text box and enter a group name of your choice.
-
Select the cameras you would like to include in the new group and tap
.
- On the home screen, you will notice a new tab called Groups. Tap to view the new group you created.
- Tap the group to stream live video from all the cameras in the group.
14.2.1 Editing a Group
To edit a group:
- On the home screen, tap the Groups tab.
- Tap Edit next to the group you want to edit. The Edit Group screen appears.
- Tap Save after you make your changes.
14.2.2 Deleting a Group
To delete a group:
- On the home screen, tap the Groups tab.
- Tap Edit next to the group you want to edit. The Edit Group screen appears.
- Swipe to the bottom of the screen and tap Delete Group.
- A confirmation pop-up appears. Tap Delete Group again. Your group is deleted.
14.3 Using History Mode
History mode allows you to view recorded video saved on your recorder’s hard drive.
- From the Home screen, tap View Live next to the device name / device ID of the recorder you would like to play back from. The FLIR Secure app will stream live video from all cameras connected to your recorder.
-
Tap
 .
.
-
The History screen appears.
History Screen:
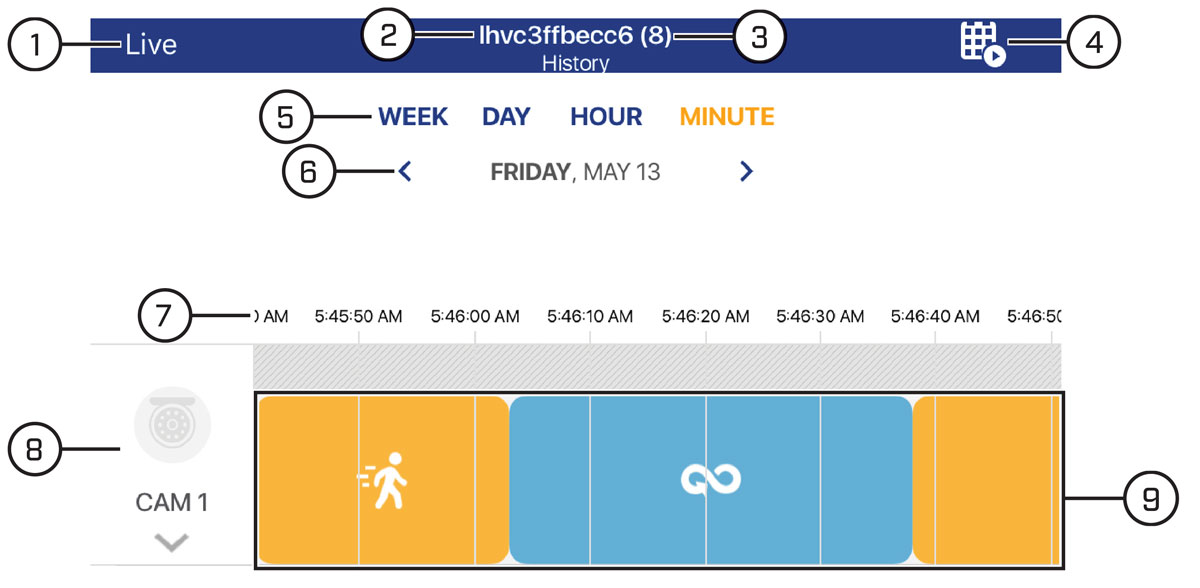
- Go back to Live View
- Device Name / ID of your recorder
- Shows the number of cameras connected to your recorder
- Play multiple recordings within a desired time frame.
- Tap to select a time scale. You can search recordings by week, day, hour, or minute.
- Tap the left / right arrow to select the day you would like to play back from.
- Changes according to the time scale selected. For example, if you select DAY as your time scale, this area shows: 12 AM, 4 AM, 8 AM, etc.
- Swipe up / down to select the camera channel you would like to play back from.
- Swipe left / right to search for recordings. Tap inside the timeline to select the playback time. Playback starts immediately at the selected time.
To use History mode:
Playback Controls:
- Channel, day, and time indicator
- Tap anywhere in the playback video to pause / play.
- Indicates the type of recording (for example, motion or continuous event).
- Shows the length of the recording and how much has been viewed. You can tap and drag inside the time bar to select the time you wish to view.
14.3.1 How to Play Multiple Recordings
To play multiple recordings within a desired time frame for a single channel:
- From the Home screen, tap the camera channel under the recorder you would like to play back from. The FLIR Secure app will stream live video from the selected camera channel.
-
Tap
. The History screen appears.
-
Tap
 . The Play Recordings screen appears.
-
Play Recordings Screen
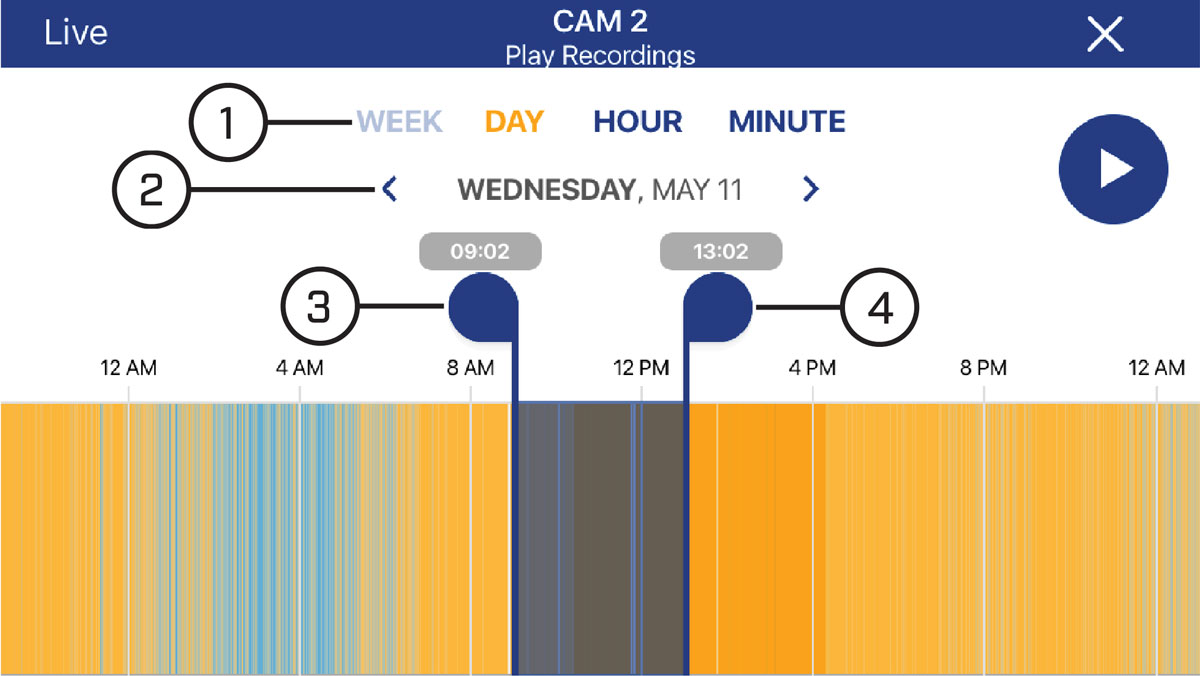
- Select the time scale. You can search recordings by week, day, hour, or minute.
- Tap the left / right arrow to select the day you would like to play back from.
- Playback start marker.
- Playback end marker.
- Tap and drag the markers to set a time frame for playback. The marker on the left sets the start time for playback and the marker on right sets the end time.
-
Tap
 /
/  . Playback will start within the time frame that you selected.
14.4 How to Manage Devices in the FLIR Secure app
You can add, delete, or modify your devices in the FLIR Secure app:
To add devices in the FLIR Secure app, see
14
FLIR Secure: Connecting to the DVR Using a Mobile Device
- From the Home screen, tap a camera channel under the recorder you want to modify. The FLIR Secure app will stream live video from the selected camera channel.
-
Tap
. The app opens a channel settings screen.
- Swipe to the bottom of the screen and tap DEVICE SETTINGS.
- The Device Settings screen appears. You can modify the name of your device, enable / disable mobile and device error notifications.
- Tap Save after you make your changes.
To modify a device:
- From the Home screen, tap a camera channel under the recorder you want to delete. The FLIR Secure app will stream live video from the selected camera channel.
-
Tap
. The app opens a channel settings screen.
- Swipe to the bottom of the screen and tap DEVICE SETTINGS.
- The Device Settings screen appears. Swipe to the bottom of the screen and tap REMOVE DEVICE.
- A confirmation pop-up appears, tap OK.
To delete a device: