8 Using the System
Use the system’s graphical on-screen display to navigate menus and configure options and settings.
8.1 On-Screen Display
The system shows the following for all display views:

-
Display area:
- Click on a channel to view in full-screen; click again to return to split screen.
- Right-click to open the Quick Menu.
- Hover the mouse cursor over the bottom of the screen to open the Navigation Bar. Move the mouse cursor away from the bottom of the screen to close the navigation bar.
- Move the mouse to the top of a channel to view the Camera Toolbar.
- Click-and-drag cameras to rearrange the channel display. This does not affect the channels each camera is connected or recording to.
- Channel name
-
![Graphic]() : Camera is continuously recording.
: Camera is continuously recording.
-
![Graphic]() : Motion has been detected and video is recording.
: Motion has been detected and video is recording.
-
![Graphic]() : Motion has been detected but video is not recording.
: Motion has been detected but video is not recording.
- Date & time: Current system date and time. For details on setting the date and time, see 9 Setting The Time .
8.2 Using the Quick Menu
The Quick menu gives you access to the system’s key functions. To access the Quick Menu, right-click the screen during live
view.

The Quick Menu has the following options:
- View: Select a camera in full-screen or select a multi-channel display.
- Pan/Tilt/Zoom: Access controls for PTZ cameras (not included).
- AutoFocus: Control auto focus cameras (not included). This menu item is only available when an IP camera channel is enabled, see 14.1.8 Selecting Cable Type to enable IP camera channels.
- Camera Setting: Configure image settings for cameras.
- Info: Opens the system information window.
-
Sequence: Click to start/stop sequence mode.
- In sequence mode, the system will automatically cycle through connected cameras every few seconds.
-
A
![icon]() will appear to show that sequence mode is on.
will appear to show that sequence mode is on.
-
Click the icon to pause sequence mode on the channel that is currently shown (icon changes to
![icon]() ). Click again to resume sequence mode.
). Click again to resume sequence mode.
- Right-click and select Sequence to return to normal viewing mode.
- Disable Beep: Disable current audible warning.
- Playback: Search/playback recorded video. See 11 Playback .
- Manual: Open the Record menu to select manual recording options. See 10.3 Setting up Scheduled or Manual Recording .
- Remote Device: Add IP cameras over the LAN. This menu item is only available when an IP camera channel is enabled, see 14.1.8 Selecting Cable Type to enable IP camera channels.
- Main Menu: Open the Main Menu. See 14 Using the Main Menu .
8.3 Adjusting Camera Settings
Use the Camera Settings menu to adjust image settings for your cameras.
- Right-click on the channel you would like to configure and select Camera Setting. Enter the system password if prompted.
-
Configure the following settings as needed:
![Graphic]()
- Cable Type: Select the cable type. It is recommended to use Coaxial, as it is the default for MPX camera. Use UTP with MPX cameras only if you are using cabling with resistance higher than 10Ω per 100m (330ft) and you are having image quality issues.
- Time Period: Configure the time periods during which the camera settings will be enabled.
- Saturation: Adjust the vibrancy of colors in the image.
- Brightness: Adjust the image brightness.
- Contrast: Adjust the image contrast.
- Chroma: Adjust the image chroma.
- Sharpness: Adjust the image sharpness.
- Enhance: Enhance the image.
- NR: Adjust the noise reduction of the image.
- Click OK to save changes.
To adjust image settings:

8.4 Using the Navigation Bar
The Navigation Bar gives quick access to certain functions and menus.
-
In live view, hover the mouse cursor over the bottom of the screen to open the Navigation Bar. The Navigation Bar has the
following options:
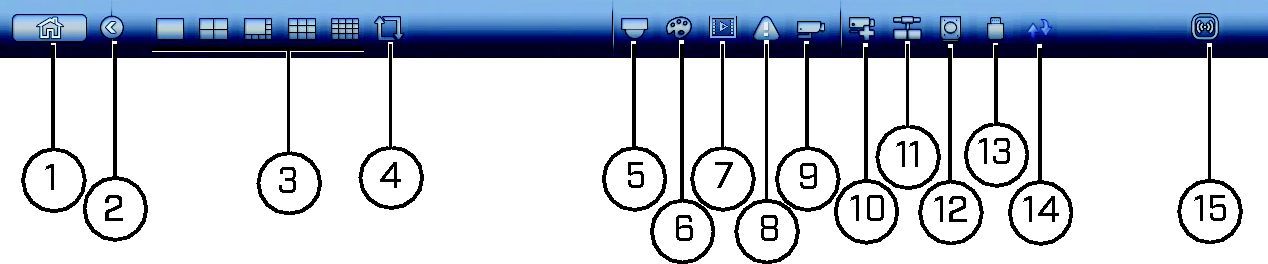
- Main Menu.
- Collapse.
- Select display layout.
- Sequence: Click to start/stop sequence mode.
- PTZ: Click to open PTZ controls.
- Camera Setting: Click to open camera image settings.
- Playback: Search and playback recorded video. See 11 Playback .
- Event: View alarms in progress. See 14.2.4 Alarm Status .
- Channel Info: Click to access status information about connected cameras.
- Remote Device: Add IP cameras over the LAN. This menu item is only available when an IP camera channel is enabled, see 14.1.8 Selecting Cable Type to enable IP camera channels.
- Network: Configure network settings for your system. See 14.3.1 Network .
- HDD Manager: Manage hard drives connected to the system. See 14.3.17 Formatting the Hard Drive .
- USB Manager: Click to access options for connected USB thumb drives (not included). You can backup video, logs, or system configurations and install firmware upgrades.
- Upgrade: Click to check for firmware upgrades. Your system must be connected to the Internet to check for firmware upgrades.
- Warning Light and Siren — Deterrence cameras only: Click to activate warning lights and sirens for all connected deterrence cameras. Click again to deactivate.
To open the Navigation bar:
8.5 Using the Camera Toolbar
The Camera Toolbar is used to perform actions on a specific channel.
-
Move the mouse to the top of the channel display. The Camera Toolbar has the following options:
![Graphic]()
- Instant playback
- Zoom
- Real-time backup
- Snapshot
- Mute/unmute audio
- Camera Warning light — Deterrence cameras only
- Camera Siren — Deterrence cameras only
To access the Camera Toolbar:

8.5.1 Using Instant Playback
Instant Playback is used to playback the last 5~60 minutes of video from the selected channel. You can also access Instant
Playback in split-screen mode, while still viewing live video from the other channels.
-
Move your mouse to the top of the channel display and click
![icon]() .
.
- Right-click to exit Instant Playback.
To use Instant Playback:
8.5.2 Using Digital Zoom in Live Display
-
Move your mouse to the top of the channel display and click
![icon]() to activate digital zoom. A check mark will appear in the icon to indicate digital zoom is activated.
to activate digital zoom. A check mark will appear in the icon to indicate digital zoom is activated.
-
Click and drag inside the channel to zoom in.
- Click and drag to pan the zoom area.
- Right-click to zoom out and select a new zoom area.
-
Click
![icon]() to disable digital zoom. Note that the channel will remain at the same zoom level until you right-click inside it.
to disable digital zoom. Note that the channel will remain at the same zoom level until you right-click inside it.
8.5.3 Using Real-time Backup
Real-time backup allows you to save footage from the live display to a USB thumb drive (not included) or external hard drive
(not included).
- Insert the USB thumb drive or external hard drive into one of the USB ports on the system.
-
Move your mouse to the top of the channel display and click
![icon]() to start Real-time Backup.
to start Real-time Backup.
-
Click
![icon]() again to end Real-time Backup. The file is saved to your USB device.
again to end Real-time Backup. The file is saved to your USB device.
To use Real-time Backup:
8.6 Activating Deterrence Features Manually (Deterrence Cameras Only)
The camera’s deterrence features deter suspicious activities from occurring by flashing a warning light and/or sounding a
siren from the camera. You can manually activate these features using the camera toolbar.
-
From live view, hover near the top of a channel to reveal the camera toolbar.
 Deterrence Icons
 -
Click the deterrence icons to activate / deactivate the following deterrence features:
-
Click the icon to activate (
 ) / deactivate (
 ) the camera warning light.
-
Click the icon to activate (
 ) / deactivate (
 ) the camera siren.
-
Click the icon to activate (
To activate deterrence features manually:
8.7 Using the Virtual Keyboard
The Virtual Keyboard is used to input text or numeric values in certain menus.

- Backspace.
- Enter capital letters.
- Confirm entry.