18 DDNS Setup (Advanced)
Free DDNS service is available as an optional connectivity method to connect to your system over the Internet.
DDNS Service is not required to connect to your system, since the system supports FLIR Cloud™ . For details on setting up your system using FLIR Cloud™
, see
15 Connecting to Your System Over the Internet on PC or Mac
.

18.1 Accessing your System within a Local Network (LAN)
You can connect to your system through using the Client Software through the local area network (LAN). It is recommended to
confirm connectivity over a local network before setting up your system for DDNS connectivity.
18.1.1 Step 1 of 3: Connect your System to Your Router
- Power off your system by disconnecting the power adapter.
- Connect an Ethernet cable (included) to the LAN port on the rear panel of the system. Connect the other end of the Ethernet cable to an empty LAN port (usually numbered 1~4) on your router.
-
Reconnect the power adapter to power the system back on.
![Graphic]()

18.1.2 Step 2 of 3: Obtain the System’s Local IP Address
-
Right-click to open the Quick Menu and click Info. Enter the system user name (default:
admin
) and password (default:
000000
).
![Graphic]()
-
Write down the IP Address of the system.
- A local IP looks something like this: 192.168.5.118.
18.1.3 Step 3 of 3: Connect to the System’s Local IP Address
Follow the steps below to confirm connectivity over a local network on a PC or Mac.
To connect using the system’s local IP address:
-
Download and install the client software. To find the client software visit
www.lorextechnology.com
, search for the model number of your product, click on your product in the search results, and click on the Downloads tab.
- PC Users: Download and install the Client Software for PC .
- Mac Users: Download and install the Client Software for Mac. Double click to extract the software. Drag the software to Applications.
-
Once installation is finished, double-click the FLIR Cloud™ Client icon (
![icon]() ) from the desktop or Applications list.
) from the desktop or Applications list.
-
Log into the Client Software using the Client Software user name (default: admin) and password (default: admin) and then click Login.
![Graphic]()
-
The client scans your LAN for connected systems. Check your system (a) and click Add (b).
![Graphic]()
- Enter the password for your system (default: 000000 ) and click OK.
-
If this is the first time you are connecting, you will be prompted to change the system password.
![Graphic]()
-
Enter a new 6 character password and click OK. This password will be used to connect to your system from now on.
![Graphic]()
-
Click
![icon]() then
then ![icon]() .
.
-
Click and drag Default Group to the display window to open your cameras in live view.
![Graphic]()


Result
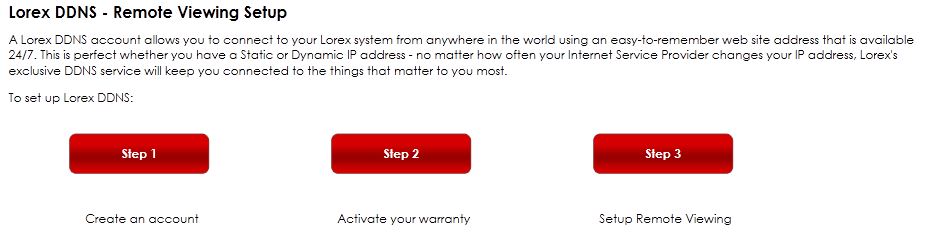
18.2 DDNS Setup—Access your System Remotely over the Internet
Setting up DDNS connectivity allows you to view your system from any computer or compatible mobile device with Internet access.
- Port forward the HTTP port (default: 80 ) and Client port (default: 35000 ) on your router to your system’s IP address.
- Create a DDNS account.
- Enable DDNS on the system.
- Test the remote connection by entering your DDNS address in the client software.
To set up remote connectivity with your system, you must:
18.2.1 Step 1 of 4: Port Forwarding
You must port forward the HTTP port (default:
80
) and Client port (default:
35000
) on your router to your system’s IP address before you can remotely connect to your system. There are several methods to
port forward your router:
- Use the Auto Port Forwarding Wizard (PC only) to port forward the required ports (see www.lorextechnology.com for details). For instructions, see the Auto Port Forward Wizard manual on www.lorextechnology.com .
- Manually port forward the required ports on your router to your system’s IP address by following your router manufacturer’s instructions. For more information on port forwarding, see the reference guides on www.lorextechnology.com .
18.2.2 Step 2 of 4: Create a DDNS Account
Lorex offers a free DDNS service for use with your system. A DDNS account allows you to set up a web site address that points back
to your local network. This allows you to connect to your system remotely. You must create a DDNS account in the same network
as your system.
-
In your browser, go to
http://www.lorexddns.net
and click Step 1.
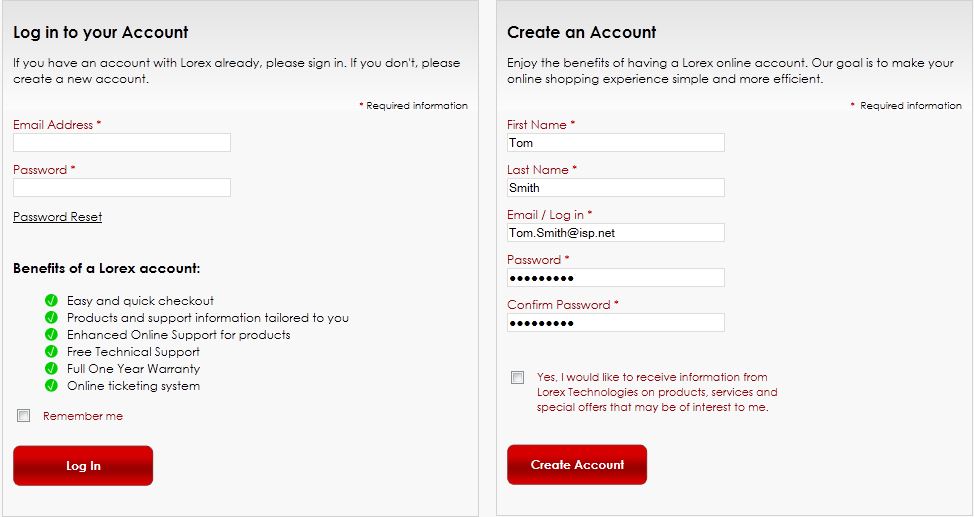
-
The My Lorex account login screen opens (if you are already logged in, skip to step 4). Create a new account or log into an existing account.
To create a new account, fill in the required fields on the right and click Create Account.
-
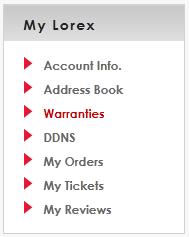
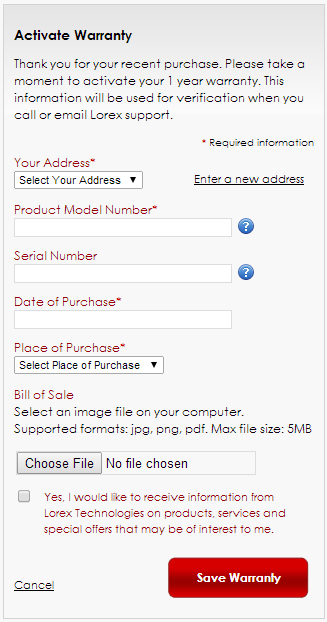
Click Warranties to register your product for warranty.
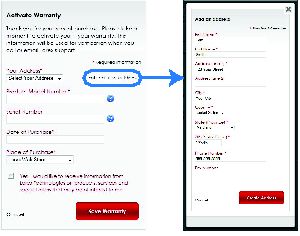
- The Warranty page opens. Click Activate Warranty to register your product for warranty.
-
Under Your Address, select an address or click Enter a New Address to create a new address. Fill in your address information and click Create Address.
-
Fill in the warranty registration form with your product and purchase details. Check the sticker underneath your system for
the Product Model Number and Serial Number. You can also upload a scan, photo, or electronic copy of your receipt or bill
of sale. Click Save Warranty.
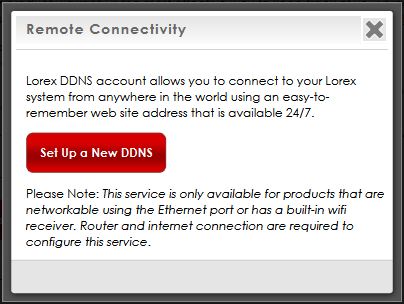
-
A page pops up to prompt you to register your product for Lorex DDNS. Click Set Up a New DDNS.
-
Configure the following:
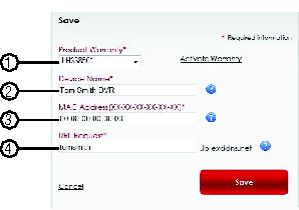
- Product Warranty: Select the product warranty you created in the previous steps.
- Device Name: Enter a name for your device. You can enter your name, business name, or anything of your choice. This is used to identify this device in your list of activated DDNS accounts that appears anytime you visit the DDNS page.
-
MAC Address: Enter the MAC address of your Lorex product. To find the MAC address:
-
Right-click to open the Quick Menu and click Info. Enter the system user name (default:
admin
) and password (default:
000000
).
-
Right-click to open the Quick Menu and click Info. Enter the system user name (default:
admin
) and password (default:
000000
).
- URL Request: Enter the web site address that will be used to connect to your Lorex product. For example, if you enter tomsmith, the address to access your video will be http://www.tomsmith.lorexddns.net .
-
Click Save to register your product for DDNS. A confirmation email will be sent to the email address used to register for My Lorex. You will need this information to enable remote access to your system. Record your information below:
Domain name/URL Request:DDNS User Name:Device DDNS password:
To setup your free Lorex DDNS account:
18.2.3 Step 3 of 4: Enable DDNS on the System
- Right-click and click Main Menu. Enter the system password if prompted.
-
Click
![icon]() and then click Network>DDNS.
and then click Network>DDNS.
![Graphic]()
- Check Enable.
- Under Domain Name, enter the Domain Name/URL Request your received in the email after registering for DDNS.
- Under User Name, enter your DDNS User Name.
- Under Password, enter your DDNS Device password.
- Click OK to save your settings.
To enable DDNS in your System:

18.2.4 Step 4 of 4: Connect to the System’s DDNS Address
To connect using the system’s DDNS address:
-
Download and install the client software on a remote computer. To find the client software visit
www.lorextechnology.com
, search for the model number of your product, click on your product in the search results, and click on the Downloads tab.
- PC Users: Download and install the Client Software for PC.
- Mac Users: Download and install the Client Software for Mac. Double click to extract the software. Drag the software to Applications.
-
Once installation is finished, double-click the FLIR Cloud™ Client icon (
![icon]() ) from the desktop.
) from the desktop.
-
Log into the Client Software using the Client Software user name (default: admin) and password (default: admin) and then click Login.
![Graphic]()
-
Click Add Device.
![Graphic]()
-
Enter the following:
![Graphic]()
- Check By IP/Domain to add a system using the DDNS address.
- Device Name: Choose a name for your system of your choice.
- IP/DDNS Address: Enter the Domain Name/URL Request you received in the email when you registered for DDNS followed by .lorexddns.net .
- Client Port: Enter the Client Port (default: 35000 ).
- User Name: Enter the system User Name (default: admin ).
- Password: Enter the system Password (default: 000000 ).
-
Click Add. If this is the first time you are connecting, you will be prompted to change the system password.
![Graphic]()
-
Enter a new 6 character password and click OK. This password will be used to connect to your system from now on.
![Graphic]()
-
Click
![icon]() then
then ![icon]() .
.
-
Click and drag Default Group to the display window to open your cameras in live view.
![Graphic]()


Congratulations! You can now connect over the Internet to view and playback video on your computer.