4 Basic System Setup
4.1 STEP 1: Connect cameras
Option 1: Direct Connection to NVR
Test your cameras prior to selecting a permanent mounting location by temporarily connecting the cameras and cables to your
recorder. Connect the cameras to the recorder using the RJ45 Ethernet extension cables provided with your cameras.

Option 2: Connect Cameras to Local Network
You can also connect your IP cameras to your local network for flexible installations. For details, see
4.8 Connecting Cameras to the Local Area Network (LAN)
.
4.2 STEP 2: Connect router
Connect the recorder to your router using the included Ethernet cable.

4.3 STEP 3: Connect mouse
Connect the included mouse to a USB port on the recorder.

4.4 STEP 4: Connect monitor
Connect the recorder to a monitor using the included HDMI cable (supports up to 4K resolution).

OR
Connect the recorder to a monitor using a VGA cable (not included - supports up to 1080p resolution).

4.5 STEP 5: Connect power
Use the included power adapter to connect the recorder to a nearby outlet.
Turn on the power switch on the back of the unit to power up the recorder.

4.6 STEP 6: Upgrade Firmware to Latest Version (If Available)
If a firmware upgrade is available, you will be asked to install it once the system starts up. It is recommended to upgrade
your system firmware and client software or mobile apps to the latest version to ensure remote connectivity to the system
and support newly-developed features.
- After startup, a notification will appear asking you to upgrade the firmware. Click OK to upgrade.
- Enter the system user name (default: admin) and your secure password, then click OK. Wait for the firmware update to complete. The system will restart once the firmware has been upgraded.
If a firmware upgrade is available:
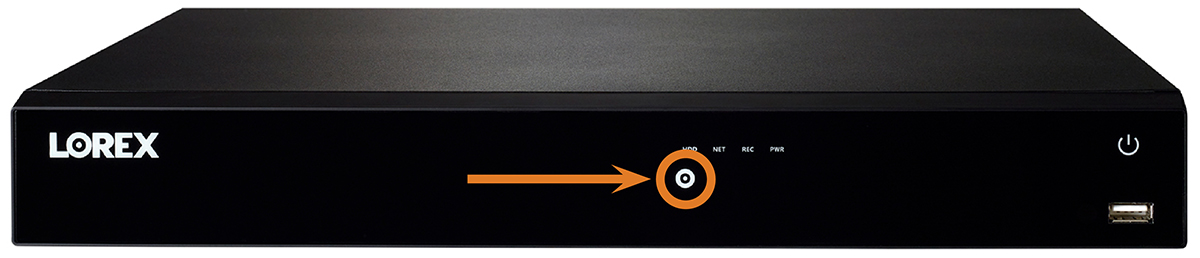
4.7 Quick Access to System Information
Perform one of the following actions to bring up the system information window. This window contains vital system information
including the model number, serial number, and device ID.

To quickly open a window that displays important system information:
-
From the Live View display, right-click to open the Quick Menu, then click Info.
OR
-
Press the front panel button on the recorder.
![Graphic]()
4.8 Connecting Cameras to the Local Area Network (LAN)
For flexibility, you may also connect IP cameras to the same Local Area Network (LAN) as the NVR instead of connecting them
directly to NVR. This is accomplished by connecting the cameras to the same router as the NVR.
For these installations, an external PoE switch (sold separately) or power adapter (sold separately) must be used to provide
power to each IP camera. You also must add the cameras on the NVR before they will show a picture on the monitor or be recorded
by the NVR.
Follow the steps below to connect the cameras to the NVR over the LAN.
Step 1 of 2 — Option A: Connecting cameras to your local network using a PoE switch:

- Connect an Ethernet cable from the LAN port on an external PoE switch (sold separately on ) to your router using a CAT5e or higher Ethernet cable. Connect the power cable to the PoE switch and to a power outlet or surge protector.
- Connect the IP cameras to the PoE switch using the Ethernet extension cables. The PoE switch will provide power and video transmission the same way as your NVR.
Step 1 of 2 — Option B: Connecting cameras to your local network using power adapters:

Step 2 of 2: Add the cameras to your NVR:
-
Right-click and select Device Search.
![Graphic]()
- Click Device Search. The system searches the network for compatible cameras.
- Check the camera(s) you would like to add.
- Click Add. The Status indicator turns green to show the camera is successfully connected.
