9 Playback
You can view and back up recorded video on the DVR.
To access playback:
-
Click
![icon]() on the Taskbar.
OR
on the Taskbar.
OR - Right-click during live view to open the Quick Menu, then click Playback.
9.1 Using Playback
Play back video recordings from a specific date and time.
To use video playback:

-
Use the calendar to select a day for playback. Dates with available recordings will be marked with a triangle in the bottom
corner (
![icon]() ).
).
- Select Record from the dropdown next to Playback Type .
- Check the channels you would like to play back, or check Select to playback all connected cameras.
-
Playback of the selected channels begins immediately. Click on a section of video in the timeline to change playback position.
Different recording types are shown with different colored bars:
- Green: Continuous recording available.
- Red: Motion recording available.
For a full overview of video playback controls, see 9.2 Video Playback Controls .
9.2 Video Playback Controls

- Calendar: Select a date to search for video recordings from.
- Playback Type: Select Record.
- Channel List: Check channels you would like to search, or check Select to search all connected channels.
- Full Screen
- Rewind
- Slow Play: Click to slow playback by half-speed. Click repeatedly to play as slow as 1/16 of normal speed.
- Play
- Pause
- Stop
- Fast-Forward
-
Digital Zoom: Click
![Graphic]() , then click-and-drag on a camera image during playback to zoom in on the selected area. Right-click to return to regular
playback. For full instructions on using digital zoom, see
9.6 Using Digital Zoom
.
, then click-and-drag on a camera image during playback to zoom in on the selected area. Right-click to return to regular
playback. For full instructions on using digital zoom, see
9.6 Using Digital Zoom
.
- Video Clip: Quickly save a section of video to a USB flash drive (not included). For full instructions on using the Video Clip, see 10.2 Video Clip Backup .
- Mute/Unmute Audio: Mute/unmute audio (audio-enabled cameras required).
- Volume Bar: Control system audio level (audio-enabled cameras required).
-
Timeline: Continuous recordings are shown with colored bars to represent different types of recording (legend shown in the bottom-right
corner of the display). Use the timeframe options in the bottom-left corner (
![icon]() ) to view a smaller or larger time period.
) to view a smaller or larger time period.
- Video Playback Area: Double-click any channel to view in full screen.
- Exit Playback: Return to live viewing mode.
9.3 Event Playback Controls
Under Playback Type, select Events to search for video recordings with the option to filter by recording type. Videos that match your search criteria will be
displayed in list form, summarizing the channel, type of recording, and time of capture. You can also easily backup events
using this menu.

- Calendar: Select a date to search for events from.
- Playback Type: Select Events.
- Start / End Time: Next to Time, enter the start and end time for your event search.
- Search Channels: Use the dropdown next to Channel to select a channel to search for events from, or select All to search all channels.
- Recording Type: Use the dropdown next to Type to select a recording type, or select All to search for all types of events.
- Search: Click to search for events based on your search criteria.
-
Search Results: Browse search results.
- Use the scroll bars to see all rows and columns of your search results.
-
Click
![icon]() /
/ ![icon]() near the bottom of the results section to browse through pages of events.
near the bottom of the results section to browse through pages of events.
- Check boxes next to any events you would like to backup to a connected USB flash drive (not included).
- Backup: Click to save events to a USB flash drive (not included). Ensure you have checked off at least one event from your search results, and that a USB flash drive is connected to the DVR. For more details on backup options, see 10 Search & Backup .
9.4 Picture Playback Controls
Under Playback Type, select Picture to search for snapshots taken using Auto and Manual Capture.
Prerequisites:
-
You must have enabled Auto and/or Manual Capture for there to be snapshots saved to the hard drive.
- For instructions on setting up Auto Capture, see 12.2.12 Configuring Auto Capture .
- For instructions on setting up Manual Capture, see 12.2.14 Enabling Manual Capture .

- Calendar: Select a date to search for snapshots from.
- Playback Type: Select Picture.
- Start/End Time: Next to Time, enter the start and end time for your picture search.
- Search Channels: Use the dropdown next to Channel to select a channel to search for snapshots from, or select All to search all channels.
- Type: Use the dropdown next to Type to select a type of snapshot to search for, or select All to search for all types of snapshots.
- Search: Click to search for snapshots based on your search criteria.
-
Search Results: Browse search results.
- Use the scroll bars to see all rows and columns of your search results.
-
Click
![icon]() /
/ ![icon]() near the bottom of the results section to browse through pages of snapshots.
near the bottom of the results section to browse through pages of snapshots.
- Check boxes next to any snapshots you would like to backup to a connected USB flash drive (not included).
- Backup: Click to save snapshots to a USB flash drive (not included). Ensure you have checked off at least one snapshot from your search results, and that a USB flash drive is connected to the DVR. For more details on backup functions, see 10 Search & Backup .
- Backward Play: Click to display snapshots in descending order, one at a time for a few seconds each. Click again to pause.
- Forward Play: Click to display snapshots in ascending order, one at a time for a few seconds each. Click again to pause.
- Stop
- Previous Page: Click to show the previous page of snapshots. If the page is set to 1×1, the page will only consist of one snapshot. See 14–16 to change page setup.
- Next Page: Click to show the next page of snapshots. If the page is set to 1×1, the page will only consist of one snapshot. See 14–16 to change page setup.
- View 1×1 Page: Click to have each page consist of only one snapshot.
- View 2×2 Page: Click to have each page consist of up to 4 snapshot.
- View 3×3 Page: Click to have each page consist of up to 9 snapshots.
9.5 Smart Search Playback Controls
Under Playback Type, select Smart to use Smart Search. Smart Search allows you to review events intelligently, with the ability to clearly see when there was
activity in a specific part of the camera image.
There are 2 methods for reviewing events using Smart Search:

-
Custom Smart Search: Enter a start and end time for a Smart Search, then click
 .
.
- If there are smart events to display in the selected time period, playback starts immediately. Smart events are played in succession starting with the earliest event.
- The Smart Search menu appears at the bottom of the screen. For details, see 9.5.1 Using the Smart Search Menu .
- Smart Search Timeline: Smart events are marked by dark green bars in the timeline, allowing you to see events that interest you at a glance.
9.5.1 Using the Smart Search Menu
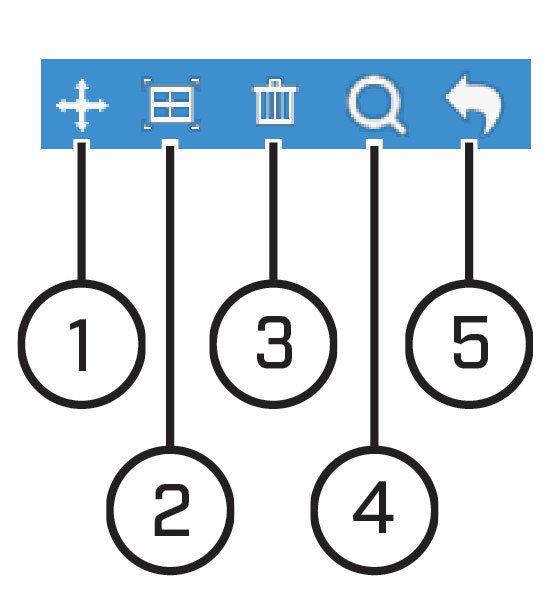
- Move Menu: Click-and-drag to move the Smart Search menu.
-
Configure Active Area: Click to set an active area for Smart Search. A red grid overlays the camera image. By default, the entire image is included
in the active area. Click-and-drag over areas of the image to remove the red grid overlay, which removes that part of the
image from the active area.
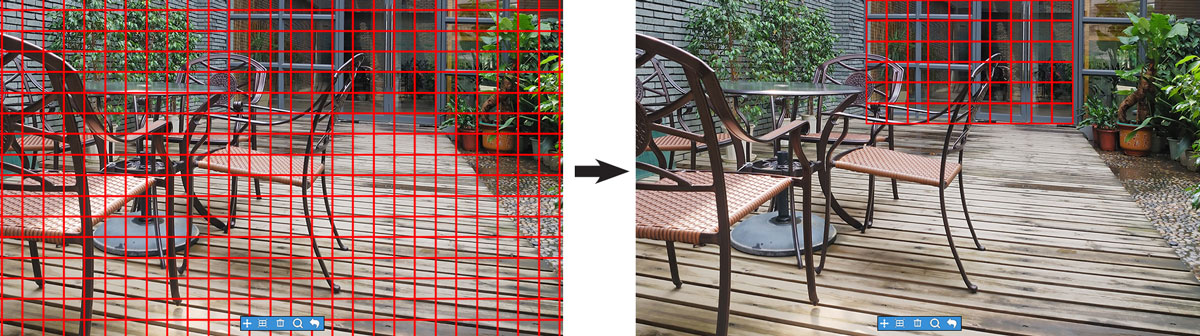
- Reset Active Area: Reset to the default of using the entire image as the active area for smart events.
- Refresh Search: Search for smart events based on a custom active area.
- Return to Playback Menu
9.6 Using Digital Zoom
Zoom in on an area of playback to enlarge a part of the image.
To use digital zoom:
- During playback, double-click the channel you would like to zoom in on to view in fullscreen.
-
Click
![icon]() .
.
-
Click-and-drag on the video playback to select an area of the image to enlarge.
The enlarged image is shown in full screen. A Picture-in-Picture view in the bottom-right corner shows the full image with the zoom area highlighted.
![Graphic]()
-
Click
![icon]() again or right-click to return to full playback.
again or right-click to return to full playback.
