12 Using the Main Menu
To open the Main Menu:
-
Click on the Main Menu button (
![icon]() ) on the taskbar from the live viewing screen.
) on the taskbar from the live viewing screen.
![Graphic]()
- Hover over one of the options in the menu to browse options in full view. Click to make a selection. If prompted, enter the user name (default: admin) and your secure password.


12.1 Main Menu Overview

- User name: Displays the name of the user account that you are currently logged into the system with.
- Settings: Configure options for display, recording parameters, network settings and more. See 12.2 Settings Menu for full instructions on using the Settings menu.
- Search: Search for video recordings and snapshots. See 12.3 Search Menu for full instructions on using the Search menu.
- Device: Configure HDD recording mode, format HDD and configure PTZ cameras. See 12.4 Device Menu for full instructions on using the Device menu.
- System: Configure system date and time, user profiles, and system information including logs. See 12.5 System Menu for full instructions on using the System menu.
- Advanced: Perform firmware upgrades or configure automatic upgrades. See 12.6 Advanced Menu for full instructions on using the Advanced menu.
- Restart: Restarts the DVR. You must enter the user name (default: admin) and your secure password before the unit restarts.
- Shut down: Shuts down the DVR. You must enter the user name (default: admin) and your secure password before the unit shuts down.
- Log in / Log out: Log in or log out of the unit. This is useful for switching between users.
12.1.1 Copying Channel Settings to Another Channel
Many parts of the DVR menu allow you to customize settings for only one channel at a time. In these cases, you can use the Copy function to copy your settings for one channel to others or all channels of the DVR.
To copy channel settings to another channel:
- Set your preferences for one channel and click Save.
-
Use the dropdown next to Copy to select the channel you wish to copy settings from. Use the dropdown next to To to select another channel or select All to copy to all connected channels, then click Copy.
![Graphic]()
- Click Save to save your settings.

12.2 Settings Menu
Configure options for display, recording parameters, network settings, and preferences for snapshots and motion detection.
12.2.1 Changing a Camera’s On-Screen Display (OSD)
By default, the channel name, date and time are shown overtop of your video recordings.
To change a camera’s OSD:

- Under Settings, click Display to open the Live tab.
- Use the dropdown next to Channel to select the channel you wish to configure the OSD for.
- Click the field next to Channel Name to change the name as it appears on the video overlay in live view and recordings.
- Use the dropdown next to Show Name to select Enable to show the channel name in live view and recordings, or Disable to hide it.
- Use the dropdown next to Record Time to select Enable to show timestamps in recordings, or Disable to hide them.
-
Click Setup next to OSD Position to change where the timestamp and channel name appear on screen. Click-and-drag the timestamp and/or channel name to change
their position on screen.
![Graphic]()
- Click Save.
- (OPTIONAL) Use the Copy function to copy your settings to another or all connected cameras. See 12.1.1 Copying Channel Settings to Another Channel for details on using the copy function.

12.2.2 Adjusting Camera Image Color
Adjust hue, brightness, contrast and saturation of a camera’s image.
To adjust image color:

- Under Settings, click Display to open the Live tab.
-
Click Setup next to Color.
The Color menu opens:
![Graphic]()
- Use the dropdown next to Channel to select the channel you wish to adjust color for.
- Click-and-drag the slider next to HUE to change the hue of the image.
- Click-and-drag the slider next to BRIGHTNESS to change the brightness of the image.
- Click-and-drag the slider next to CONTRAST to change the contrast of the image.
- Click-and-drag the slider next to SATURATION to change the saturation of the image.
- Click Save.

12.2.3 Setting up Covert Recording
Covert recording allows you to hide channels from the live view of the DVR while continuing to record video. You will also be able to see covert channels when viewing remotely using a computer or
mobile app.
To enable Covert recording:

- Under Settings, click Display to open the Live tab.
- Use the dropdown next to Channel to select a channel to set up covert recording for.
- Use the dropdown next to Covert to select Enable.
- Click Save. The camera image for the selected channel will appear entirely black with the caption Privacy Mode to indicate that covert recording is enabled.
- (OPTIONAL) Use the Copy function to copy your settings to another or all connected cameras. See 12.1.1 Copying Channel Settings to Another Channel for details on using the copy function.
12.2.4 Camera Type
The DVR works with multiple types of HD analog cameras. By default, the system is set to automatically detect the type of camera
so it works instantly with the recorder. For a full list of compatible cameras, visit
lorextechnology.com/compatibility
.
To access the camera type menu:
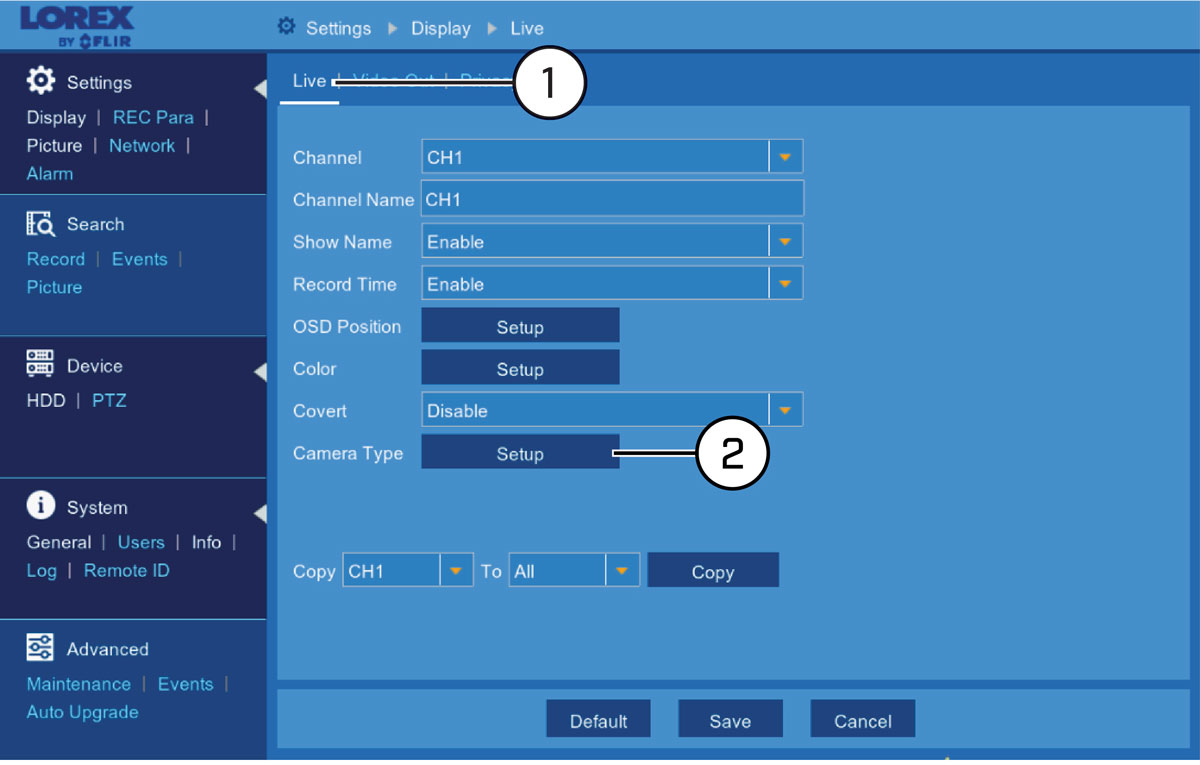
- Under Settings, click Display, then click on the Live tab.
-
Click Setup next to Camera Type.
The Camera Setup menu opens.
-
Ensure channels are set to AUTO, which automatically recognizes the camera type for instant viewing:
- AUTO: Automatically detects the camera type.
- AHD: Advanced only (1080p AHD cameras).
- AHD-3MP: Advanced only (3MP AHD cameras).
- AHD-4MP: Advanced only (4MP AHD cameras).
- TVI: Advanced only (HD-TVI cameras).
- CVI: Advanced only (HD-CVI cameras).
- Click Save.
12.2.5 Changing the DVR’s Output Resolution
To optimize display, you can change the output resolution of your DVR to match the maximum supported resolution of your monitor.
To change the DVR’s output resolution:

- Under Settings, click Display, then click on the Video Out tab.
- Use the dropdown next to VGA/HDMI Resolution to select the resolution of your monitor or TV.
- (OPTIONAL) If you are experiencing cropping of the DVR’s display, it is recommended that you check the Support Overscan box to optimize your display. This is typically only an issue for those using older Cathode Ray Tube (CRT) monitors.
- Click Save.
12.2.6 Adjusting Menu Transparency
You can increase or decrease the transparency of the on-screen menus and the Taskbar.
To adjust the transparency of on-screen menus:

- Under Settings, click Display, then click on the Video Out tab.
- Click-and-drag the slider next to Transparency to adjust transparency.
- Click Save.
12.2.7 Configuring Sequence Mode
When Sequence Mode is enabled, the DVR cycles through connected cameras to show during live viewing. You can configure the DVR to cycle through one channel at a time or show a group of channels in one screen, as well as how long each channel or group
is shown on screen before changing over.
To enable Sequence Mode:
-
Click
![icon]() on the Taskbar.
OR
on the Taskbar.
OR - Right-click in live viewing to open the Quick Menu, then click Start SEQ.
To configure Sequence Mode:

- Under Settings, click Display, then click on the Video Out tab.
- Use the dropdown next to SEQ Mode to set how many channels appear on screen at a time while Sequence Mode is enabled.
- Click the field next to SEQ Dwell Time to enter how many seconds (1–300) each channel or group of channels is shown on screen before cycling to the next channel or group.
- Click Save.
12.2.8 Configuring Privacy Zone(s)
A privacy zone blocks out a portion of the camera image with a black box, letting you have privacy in certain parts of a camera image. You
can configure up to 4 privacy zones per channel.
To configure privacy zone(s):

- Under Settings, click Display, then click on the Privacy Zone tab.
- Use the dropdown next to Channel to select a channel to set a privacy zone for.
- Select Enable from the dropdown next to Mask Area.
- Check the boxes next to Area Setup for each privacy zone you wish to set for the selected channel. For example, if you wish to set up 4 privacy zones, check all 4 of the boxes.
-
Click Setup. The camera image appears in full-screen. Click-and-drag to draw privacy zones on the camera image. Right-click to return
to the menu.
![Graphic]()
- Click the number in the top-left corner of an existing privacy zone to move it to another area of the image.
- Click-and-drag to the edge of an existing privacy zone to resize it.
- Click Save.
- (OPTIONAL) Use the Copy function to copy your settings to another or all connected cameras. See 12.1.1 Copying Channel Settings to Another Channel for details on using the copy function.

12.2.9 Configuring Recording Parameters
Configure basic video recording options.
To configure recording parameters:

- Under Settings, click Record to open the Record tab.
- Use the dropdown next to Channel to select a channel to set the recording parameters for.
- Select Enable to allow recording on the selected channel.
- Use the dropdown next to Stream Mode to configure the recording mode. Select DualStream to record using mainstream recording settings while using the substream for remote viewing, or select MainStream to use mainstream recording only.
- Select Enable from the dropdown next to Pre Record to enable pre-recording for motion events. To setup motion detection preferences, see 12.2.20 Configuring Motion Detection Settings .
- Click Save.
- (OPTIONAL) Use the Copy function to copy your settings to another or all connected cameras. See 12.1.1 Copying Channel Settings to Another Channel for details on using the copy function.
12.2.10 Setting the Recording Schedule
The recording schedule determines the time periods that the system will record video during. You can set separate schedules
for continuous and motion recording within the same channel.
To set a recording schedule:

- Under Settings, click Record, then click on the Schedule tab.
- Use the dropdown next to Channel to select a channel to set the recording schedule for.
- Select Continuous to edit the continuous recording schedule (represented by green bars), or Motion to edit the motion recording schedule (yellow bars).
-
Click or click-and-drag over existing bars to remove sections from the recording schedule. For blank areas of the schedule,
click or click-and-drag to add sections to the recording schedule.
![Graphic]()
- Click Save.
- (OPTIONAL) Use the Copy function to copy your settings to another or all connected cameras. See 12.1.1 Copying Channel Settings to Another Channel for details on using the copy function.

12.2.11 Configuring System Recording Quality (Mainstream and Substream)
The system uses 2 recording streams: the Mainstream is the high-quality stream used for live viewing and recording, while the Substream is a lower quality stream used for remote viewing and playback. This allows you to record high-quality video locally, as
well as review video remotely with relatively low bandwidth requirements.
- For instructions on configuring the mainstream, see 12.2.11.1 Configuring the Mainstream .
- For instructions on configuring the substream, see 12.2.11.2 Configuring the Substream .
12.2.11.1 Configuring the Mainstream

- Under Settings, click Record, then click on the Mainstream tab.
- Use the dropdown next to Channel to select a channel to set mainstream for.
- Use the dropdown next to Resolution to set the recording resolution.
- Use the dropdown next to FPS to set the number of frames per second.
- Use the dropdown next to Bitrate Control to set the control method. Select CBR (default) to use a Constant Bit Rate, or VBR for a Variable Bit Rate. For VBR, use the second dropdown to select a quality level for the video stream.
- Use the dropdown next to Bitrate Mode to set the bitrate mode. Select Predefined to select a preset value from the Bitrate dropdown, or User-defined to enter a custom bitrate.
- Use the dropdown next to Bitrate to set the bitrate mode (predefined bitrate mode), or enter a custom bitrate between 1024-8192Kbps (user-defined bitrate mode).
- Check Audio to enable audio (audio-enabled camera required).
- Click Save.
- (OPTIONAL) Use the Copy function to copy your settings to another or all connected cameras. See 12.1.1 Copying Channel Settings to Another Channel for details on using the copy function.
12.2.11.2 Configuring the Substream

- Under Settings, click Record, then click on the Substream tab.
- Use the dropdown next to Channel to select a channel to set substream for.
- Use the dropdown next to Resolution to set the recording resolution.
- Use the dropdown next to FPS to set the number of frames per second.
- Use the dropdown next to Bitrate Control to set the control method. Select CBR (default) to use a Constant Bit Rate, or VBR for a Variable Bit Rate. For VBR, use the second dropdown to select a quality level for the video stream.
- Use the dropdown next to Bitrate Mode to set the bitrate mode. Select Predefined to select a preset value from the Bitrate dropdown, or User-defined to enter a custom bitrate.
- Use the dropdown next to Bitrate to set the bitrate mode (predefined bitrate mode), or enter a custom bitrate between 1024-8192Kbps (user-defined bitrate mode).
- Check Audio to enable audio (audio-enabled camera required).
- Click Save.
- (OPTIONAL) Use the Copy function to copy your settings to another or all connected cameras. See 12.1.1 Copying Channel Settings to Another Channel for details on using the copy function.
12.2.12 Configuring Auto Capture
You can use Auto Capture to automatically capture snapshots of a camera image at repeating intervals throughout the day or during motion events. Auto
Capture can help to conserve hard drive space during times when video recording is not required. By default, Auto Capture
is disabled.
To configure Auto Capture:

- Under Settings, click Picture, then click on the Picture tab.
- Use the dropdown next to Channel to select a channel to configure Auto Capture for.
- Select Enable from the dropdown next to Auto Capture.
- Use the dropdown next to Stream Mode to select Mainstream or Substream for Auto Captures.
- Select a time period from the dropdown next to Continuous Interval. A snapshot will be captured at every continuous interval even if there is no activity in the camera image.
- Select a time period from the dropdown next to Alarm Interval. A snapshot will be captured at every alarm interval while a motion event is occurring.
- Click Save.
- (OPTIONAL) Use the Copy function to copy your settings to another or all connected cameras. See 12.1.1 Copying Channel Settings to Another Channel for details on using the copy function.
12.2.13 Setting a Picture Schedule for Auto Capture
The picture schedule determines the time periods that the system will use Auto Capture during. You can set separate schedules
for continuous and motion snapshots within the same channel.
Prerequisites:
- You must have enabled Auto Capture on the selected channel for the picture schedule to take effect. See 12.2.12 Configuring Auto Capture for details on enabling and configuring Auto Capture.
To set a picture schedule:

- Under Settings, click Picture, then click on the Picture Schedule tab.
- Use the dropdown next to Channel to select a channel to set the picture schedule for.
- Select Continuous to edit the continuous capture schedule (represented by green bars), or Motion to edit the motion capture schedule (yellow bars).
-
Click or click-and-drag over existing bars to remove sections from the schedule. For blank areas of the schedule, click or
click-and-drag to add sections to the schedule.
![Graphic]()
- Click Save.
- (OPTIONAL) Use the Copy function to copy your settings to another or all connected cameras. See 12.1.1 Copying Channel Settings to Another Channel for details on using the copy function.

12.2.14 Enabling Manual Capture
Manual Capture allows you to quickly take snapshots from enabled channels.
To enable Manual Capture:

- Under Settings, click Picture, then click on the Picture tab.
- Use the dropdown next to Channel to select a channel to enable Manual Capture for.
- Select Enable from the dropdown next to Manual Capture.
-
Click Save.
You can now use Manual Capture on the selected channel using the Mini Menu. For details on using Manual Capture, see 7.3 Using the Mini Menu .
- (OPTIONAL) Use the Copy function to copy your settings to another or all connected cameras. See 12.1.1 Copying Channel Settings to Another Channel for details on using the copy function.
12.2.15 Configuring Basic Network Settings
The basic network menu allows you to change port numbers if needed and configure the network protocol type (DHCP or static).
To configure basic network settings:

- Under Settings, click Network to open the Schedule tab.
- Select DHCP (default — recommended) or Static.
- Click the fields next to Client Port and HTTP Port to change port numbers if required.
- (FOR STATIC IP ONLY) Click the fields next to IP Address, Subnet Mask, Gateway and DNS to edit as required.
- Click Save.
12.2.16 Setting up Email Notifications
You can configure the system to send email notifications about important activity from your security system. To have the option
of using Lorex’s free email server (recommended) or using a different one.
- For instructions on enabling email notifications using the Lorex server, see 12.2.16.1 Email Notifications — Using the Lorex server (recommended) .
- For instructions on enabling email notifications using a different mailing server, see 12.2.16.2 Email Notifications — Using your own server information .
12.2.16.1 Email Notifications — Using the Lorex server (recommended)

- Under Settings, click Network, then click on the Email tab.
- Select Default from the dropdown next to Email to enable the default Lorex mail server.
- Click to enter up to 3 email addresses that will receive email notifications from the system.
- Use the dropdown next to Interval to set the minimum amount of time between email notifications. This can be used to limit the number of notifications you receive throughout the day.
-
Click Save.
Email notifications are now enabled. The default schedule is set to send email notification whenever motion is detected or a system warning occurs. To configure the schedule for email notifications, see 12.2.17 Setting an Email Schedule .
12.2.16.2 Email Notifications — Using your own server information

- Under Settings, click Network, then click on the Email tab.
- Select Enable from the dropdown next to Email to enable email notifications using a custom mail server.
- Use the dropdown next to Encryption to select an encryption type.
- Click the field next to SMTP Port to enter the SMTP port.
- Click the field next to SMTP Server to enter the URL used by your mail server.
- Click the field next to User Name to enter your user name for the mail server.
- Click the field next to Password to enter your password for the mail server.
- Click the field next to Sender Email to enter the sending email address. This can be any email of your choice.
- Click to enter up to 3 email addresses that will receive email notifications from the system.
- Use the dropdown next to Interval to set the minimum amount of time between email notifications. This can be used to limit the number of notifications you receive throughout the day.
-
Click Save.
Email notifications are now enabled. The default schedule is set to send email notification whenever motion is detected or a system warning occurs. To configure the schedule for email notifications, see 12.2.17 Setting an Email Schedule .
12.2.17 Setting an Email Schedule
The email schedule determines the time periods that the system will send out email notifications. You can set separate schedules
for motion events and system warnings per channel.
Prerequisites:
- You must enable email notifications for the email schedule to take effect.
- To enable email notifications using the default Lorex email server, see 12.2.16.1 Email Notifications — Using the Lorex server (recommended) .
- To enable email notifications using custom mail server information, see 12.2.16.2 Email Notifications — Using your own server information .
To set an email schedule:

- Under Settings, click Network, then click on the Email Schedule tab.
- Use the dropdown next to Channel to select a channel to set the email schedule for.
- Select Motion to edit the motion notification schedule (represented by yellow bars), or Warning to edit the system warning notification schedule (red bars).
-
Click or click-and-drag over existing bars to remove sections from the recording schedule. For blank areas of the schedule,
click or click-and-drag to add sections to the recording schedule.
![Graphic]()
- Click Save.
- (OPTIONAL) Use the Copy function to copy your settings to another or all connected cameras. See 12.1.1 Copying Channel Settings to Another Channel for details on using the copy function.

12.2.18 Configuring DDNS Settings
The primary connectivity option for this DVR uses FLIR Cloud Services to connect to your system over the Internet without requiring port forwarding or DDNS registration.
Lorex DDNS is available as an optional connectivity option. See
19 DDNS Setup (Advanced)
for details.
- For details on connecting to your system over the Internet using a smartphone or tablet (no DDNS setup required), see 14 Connecting to Your System Using Smartphone or Tablet Apps .
- For details on connecting to your system over the Internet using a PC or Mac computer (no DDNS setup required), see 13 FLIR Client 12 for PC / Mac .
Prerequisites:
- You must create a free Lorex DDNS account. See 19 DDNS Setup (Advanced) for full setup instructions.
To configure DDNS settings:

- Under Settings, click Network, then click on the DDNS tab.
- Select Enable from the dropdown next to DDNS.
- Select LOREXDDNS from the dropdown next to Server.
- Click the field next to Domain Name to enter the URL shown under My DDNS Devices in your Lorex account (for example, http://www.tomsmith.lorexddns.net).
- Click the field next to User Name to enter the Username shown under My DDNS Devices in your Lorex account
- Click the field next to Password to enter the Password shown under My DDNS Devices in your Lorex account
- Click Save.
12.2.19 Configuring RTSP Streaming (Advanced)
RTSP streaming allows you to stream video from a specific camera using a web address. It is an optional connectivity method
used by 3rd party software applications.
To connect to the video stream using VLC Media Player:

- Under Settings, click Network, then click on the RTSP tab.
- Select Enable from the dropdown next to RTSP Enable.
- Select Enable from the dropdown next to Verify.
- If needed, click the field next to RTSP Port to change the port number.
- Click Save.
- Open VLC on a computer in the same network as your DVR.
-
Click Media, then click Open Network Stream....
![Graphic]()
-
Enter the RTSP address in the following format:
- rtsp://[IP address of the DVR]:[RTSP Port]/chA/B
- A = Channel number (expressed as 01 for channel 1, 02 for channel 2, etc.)
- B = Video stream (0 for mainstream, 1 for substream)
- Example: rtsp://192.168.1.128:554/ch01/0 will stream video from channel 1 of the DVR using the mainstream.
-
Click Play. The video stream will open in VLC Media Player.
If it does not connect, check the following:
- Check that the syntax on the RTSP address is correct.
- Make sure the system is connected to the network.
- If connecting over the Internet, make sure to use the remote IP address of the system and that the RTSP port is open.

12.2.20 Configuring Motion Detection Settings
The system supports motion detection on any connected camera. You can determine the sensitivity as well as the active area
for motion detection per channel.
To enable and configure motion detection:

- Under Settings, click Alarm to open the Motion tab.
- Use the dropdown next to Channel to select a channel to configure motion detection for.
- Select Enable from the dropdown next to Enable.
- Select a time period from the dropdown next to Buzzer to have the DVR make an alarm sound when motion is detected, or select Disable to keep the DVR silent.
- Use the dropdown next to Sensitivity to select a sensitivity level for motion events. The lower the sensitivity value, the more movement is required to trigger motion detection.
-
Click Setup to set the active area for motion detection. The camera image appears with a red grid overlay on the entire image, letting
you know that motion detection is active for the entire image. Click or click-and-drag to add/remove area from the red grid.
![Graphic]()
- Use the dropdown next to Post Recording to set how long the system will record video for after motion is detected.
-
Check boxes to your preference:
- Show Message: Check to have a message appear on the system when motion is detected.
- Send Email: Check to receive an email notification when motion is detected. Ensure you have enabled email notifications (see 12.2.16 Setting up Email Notifications for details).
- Full Screen: Check to have video from the selected channel appear in full screen when motion is detected.
-
Check boxes to your preference:
- Record Channel: Check to record video from the selected channel(s) when motion is detected.
- Analog Channels: Click on the numbered boxes representing channels that should also be recorded when motion is detected on the selected channel. Click the checkbox to select all.
- Click Save.
- (OPTIONAL) Use the Copy function to copy your settings to another or all connected cameras. See 12.1.1 Copying Channel Settings to Another Channel for details on using the copy function.

12.3 Search Menu
Search for and play back recordings. The Search menu also allows you to search for events and snapshots, which you can backup
to a USB flash drive (not included). For details on searching and backing up events and snapshots, see
10 Search & Backup
.
12.3.1 Search for Video Recordings
To search for video recordings:

- Under Search, click Record to open the Record tab.
- Use the dropdown next to Channel to select a channel to search for video from, or select All to search all channels.
- Use the dropdown next to Type to select the recording type.
- Use the dropdown or arrows to select the month to search for video from.
- Click Search.
- The calendar view refreshes. Days with recordings are shown using a green arrow for continuous recordings, and a red arrow for motion recordings. Click on the day you would like to play back.
- Click the numbered boxes representing channels to play back simultaneously, or check the box next to Analog Channels to select all
- Click the field next to Start Time to enter the start time (24-hour format).
- Click the field next to End Time to enter the end time (24-hour format).
-
Click Play to start playback.
For details on using video playback, see 9 Playback .
12.3.2 Search for Events
Under Search, click Events to open the event search menu. For full instructions on searching for and backing up events to a USB flash drive (not included),
see
10 Search & Backup
.
12.3.3 Search for Snapshots
Under Search, click Picture to open the snapshot search menu. For full instructions on searching for and backing up snapshots to a USB flash drive (not
included), see
10 Search & Backup
.
12.4 Device Menu
Configure hard drive and PTZ camera options.
12.4.1 Configuring Hard Drive Overwrite
By default, the hard drive in your DVR is set to overwrite automatically, meaning that the system deletes the oldest footage when the hard drive is full to make
way for new recordings. You can also select a number of days or hours the system should retain data for. For example, if you
select 30 days, the hard drive will only overwrite recordings that are at least 30 days old.
To configure hard drive overwrite:

- Under Device, click HDD to open the HDD tab.
- (For units with multiple hard drive bays) Select the hard drive you would like to configure overwrite for.
-
Use the dropdown next to Overwrite to select the overwrite mode.
- Auto: Deletes the oldest saved footage when the hard drive is full.
- 1–90 Days: Keeps footage for as long as specified before overwriting. Ensure your hard drive is large enough to retain recordings for as long as you have specified.
- Off: No footage will be overwritten.
- Click Save.
12.4.2 Formatting the Hard Drive
Formatting the hard drive deletes all saved files from the hard drive. It is recommended to format any newly-installed hard
drives before recording.
To format the hard drive:

- Under Device, click HDD to open the HDD tab.
- Select the hard drive you would like to format.
- Click Format HDD.
- Enter your DVR’s user name (default: admin) and secure password to begin formatting the drive.
12.4.3 Setting Up Hard Drive Mirroring (Advanced)
A mirror hard drive can be used to automatically backup video footage on the recording (read-write) hard drive. When a mirroring
hard drive is installed, the system can be set to record cameras in parallel to both the recording hard drive and the mirror
hard drive in case of hard drive failure.
To set up hard drive mirroring:
- Under Device, click HDD to open the HDD tab.
-
Click
![icon]() next to the hard drive you want to set up as the mirror hard drive.
next to the hard drive you want to set up as the mirror hard drive.
![Graphic]()
- Use the dropdown next to HDD ID to select the mirror drive.
- Select Mirror from the dropdown next to Disk Type.
- Use the dropdown next to Disk Group to select same group number as your primary drive. For example, if your primary drive is part of Record Drive Group 1, your mirror hard drive should be part of Mirror Drive Group 1.

12.4.4 Configuring Hard Drive Groups (Advanced)
Hard drive groups allow you to balance recordings across multiple hard drives. For example, you can record channels 1~4 to
one hard drive and 4~8 to a second hard drive. This can reduce the amount of wear on the hard drives and may extend the life
of the hard drives.
To configure hard drive groups:

- Under Device, click HDD, then click the Disk Group tab.
- Use the dropdown next to Disk Group Type to select the type of group to configure.
- Use the dropdown next to Disk Group to select the specific group within the selected group type.
- Click the numbered boxes representing channels to record channels to drives in the selected group.
- Click Save .
12.4.5 Configuring PTZ Cameras
For the DVR to communicate with PTZ cameras (sold separately), you must configure them using the main menu. To find the correct values
to enter into the menu below, see the instruction manual provided with your PTZ camera.
Prerequisites:
- Connect your PTZ camera to the DVR. For details, see 17 Connecting PTZ Cameras to the DVR .
To configure PTZ cameras:
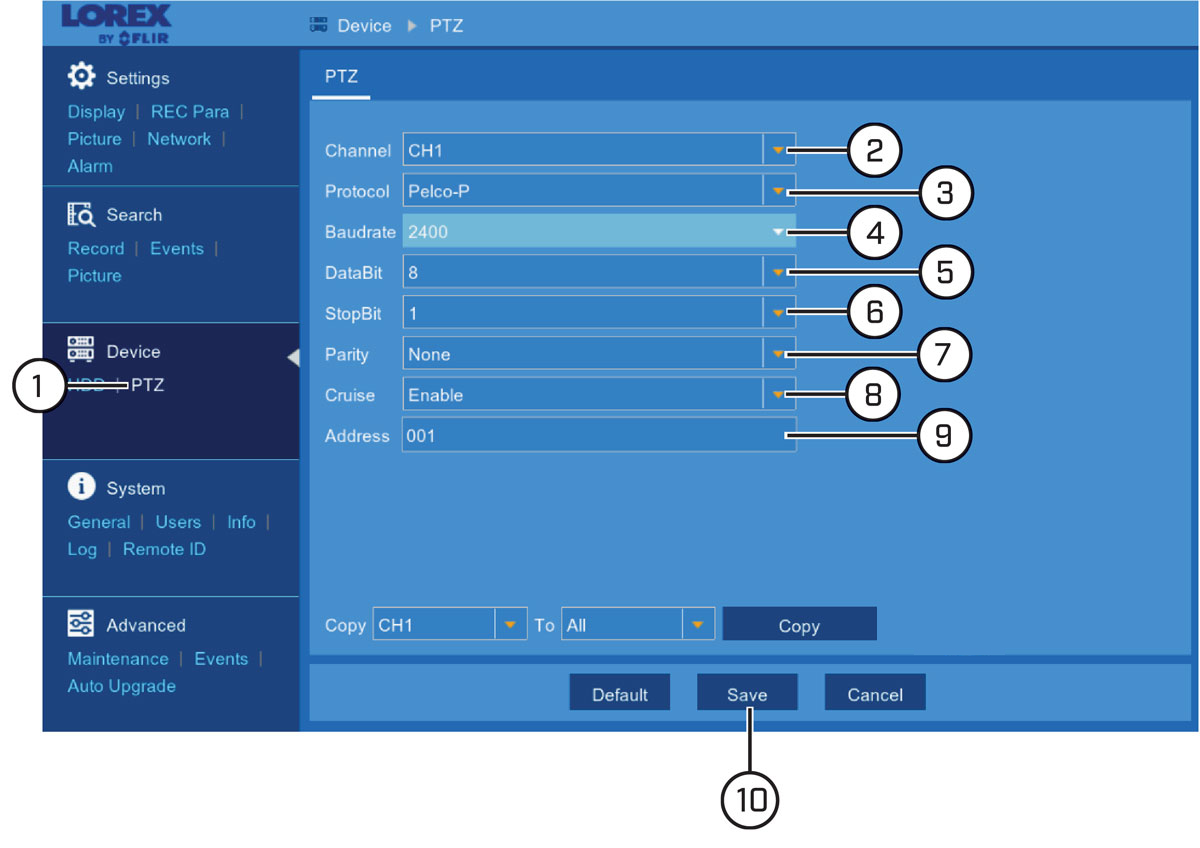
- Under Device, click PTZ to open the PTZ tab.
- Use the dropdown next to Channel to select the channel your PTZ camera is connected to.
- Select the PTZ camera’s protocol from the dropdown next to Protocol.
- Select the PTZ camera’s baud rate from the dropdown next to BaudRate.
- Select the PTZ camera’s data bit from the dropdown next to DataBit.
- Select the PTZ camera’s stop bit from the dropdown next to StopBit.
- Select the PTZ camera’s parity from the dropdown next to Parity.
- Select Enable from the dropdown next to Cruise.
- Enter the PTZ ID number in the field next to Address.
-
Click Save. You will now be able to control your PTZ camera using the DVR.
For details on using and controlling the PTZ camera, see 7.5 Using PTZ Controls .
12.5 System Menu
Change general system information such as date, time and region, edit passwords and permissions, and more.
12.5.1 Changing the Date and Time
If you need to change the date and time after completing the setup wizard, follow the steps below.
To change the DVR’s date and time:

- Under System, click General to open the General tab.
- Click the field next to Date to select the correct date from the calendar.
- Click the field next to Time to enter the correct time. Use the dropdown to select AM or PM if using 12-hour time format.
- Select how you want the date to appear from the dropdown next to Date Format.
- Select how you want the time to appear from the dropdown next to Time Format.
- Click Save.
12.5.2 Changing On-Screen Language
Change the language of on-screen text for the DVR.
To change language:

- Under System, click General to open the General tab.
- Use the dropdown next to Language to set the desired language for the DVR’s on-screen display.
- Click Save. The system language will update only once you exit the main menu.
12.5.3 Configuring Menu Time-out Option
By default, system menus are set to time-out after a set time period, taking you back to the main menu if there is no activity.
To configure or disable menu time-out:

- Under System, click General to open the General tab.
-
Select a time period from the dropdown next to Menu Timeouts.
- 30s–10min: Menus will disappear after the set time period if there is no activity on the system.
- OFF: Menus will never time-out due to inactivity.
- Click Save.
12.5.4 Changing Video Output — NTSC and PAL
Manually switch between NTSC and PAL video output.
To change the video output:

- Under System, click General to open the General tab.
- Use the dropdown next to Video Format to select either NTSC or PAL.
- Click Save. The system will reboot to properly set the new video output mode.
12.5.5 Turning Front Panel LEDs ON/OFF
Turn LEDs on the front panel of the NVR on or off.
To turn front panel LEDs on/off:

- Under System, click General to open the General tab.
- Use the dropdown next to Front Panel LED to select either ON or OFF.
- Click Save.
12.5.6 Configuring Daylight Savings Time (DST)
Customize settings for Daylight Savings Time (DST) based on your region or preference.
To configure Daylight Savings Time:

- Under System, click General, then click the DST tab.
- Select Enable from the dropdown next to DST.
- Select the time difference to use for DST from the dropdown next to Time Offset.
-
Use the dropdown next to Daylight Saving Time to select a mode of entry for effective dates:
- Select Week to choose DST time changes that are relative to the day of the week (for example, on the second Sunday of March).
- Select Date to choose a specific date and time for each DST time change (for example, on March 13th at 2:00AM).
- Enter the desired Start Time and End Time for Daylight Savings Time. System time will move forward an hour at the start time, and back an hour at the end time.
- Click Save.
12.5.7 Configuring NTP
Network Time Protocol (NTP) allows the DVR to sync with an NTP time server to ensure that system time is always accurate.
Prerequisites:
- The DVR must be connected to a router or switch on your network using the included Ethernet cable. A constant connection to the Internet is required to use NTP.
To configure NTP:

- Under System, click General, then click the NTP tab.
- Select Enable from the dropdown next to NTP.
- Select the desired NTP server from the dropdown next to Server Address (we recommend using the default ntp.lorexddns.net ).
- If needed, use the dropdown next to Time Zone to set the correct region.
- Click Update Now to sync with the NTP.
12.5.8 View System Information
View system information such as device ID, IP address, MAC address, model number, firmware version and more.
To view system information:

-
Under System, click Info to open the Info tab.
ORFrom live view, click
![icon]() on the Taskbar along the bottom of the screen.
on the Taskbar along the bottom of the screen.
12.5.9 View Channel Information
View channel information for each connected camera such as alias, mainstream and substream recording specifications.
To view channel information:

- Under System, click Info, then click the Channel Info tab.
12.5.10 View Recording Information
View recording information for each connected camera such as bitrate, recording resolution and frames per second (FPS).
To view recording information:

- Under System, click Info, then click the Record Info tab.
12.5.11 Logs — Searching and Backing Up
The system log shows you important system events, such as motion alarms and system warnings. You can easily create a backup
file of the system log for a set time period to a USB flash drive (not included).
Prerequisites:
- To back up system log events, you must connect a USB flash drive to one of the DVR’s USB ports.
To search and back up the system log:

- Under System, click Log to open the Log tab.
- Click the field next to Start Date to choose the starting date for your search from the on-screen calendar.
- Click the field next to End Date to choose the end date for your search from the on-screen calendar.
- Select the type of events you would like to search for from the dropdown next to Log Type, or select All to see the entire system log for the selected time period.
- Click the field next to Start Time to enter the starting time for your search (24-hour format). The search will begin at this time on the start date.
- Click the field next to End Time to enter the starting time for your search (24-hour format). The search will end at this time on the end date.
- Click Search.
-
Browse system log events from your search period:
- Video events can be played back instantly by clicking in the Playback column. Right-click to return to your search results.
-
Use the
![icon]() /
/ ![icon]() buttons in the bottom-right corner of the menu to move between pages of system log events.
buttons in the bottom-right corner of the menu to move between pages of system log events.
- Click Backup to create a backup of the system log for your search period.
-
The backup drive menu appears. Navigate to the folder you want the backup file to be saved in, then click OK to begin. The progress bar at the bottom of the window shows you the progress of the backup.
![Graphic]()

12.5.12 Setting the Remote ID
If you have more than one DVR, you can use the ID function to pair the included remote control to a specific DVR.
To set the remote ID:

- Under System, click Remote ID to open the Remote ID tab.
- Click the field next to ID to enter the desired ID number.
- Click Save.
- Right-click repeatedly to return to live view.
- On the remote control, press ID then enter the ID number you entered in step 2, then press ENTER to confirm.
12.6 Advanced Menu
Perform firmware upgrades, manage system events and warnings, load default settings, and save/load current system settings.
12.6.1 Manual Firmware Upgrade
The system supports automatic firmware upgrades over the network to ensure your unit is always up-to-date. It is recommended
to always use automatic upgrade unless directed to perform a manual upgrade by technical support. For details on automatic
firmware upgrades, see
12.6.6 Using Automatic Firmware Upgrade
.
Prerequisites:
- Save the .bin firmware upgrade file in the root folder of a USB flash drive (not included), and connect the drive to one of the USB ports on your DVR.
To manually upgrade the DVR’s firmware:

- Under Advanced, click Maintenance to open the Maintenance tab.
- Click Firmware Upgrade.
- The drive menu appears. Navigate to and select the .bin firmware file, then click OK.
- A confirmation window appears. Click OK to confirm.
- Allow 5-10 minutes for the system to upgrade and reboot.
12.6.2 Restoring Default Settings
Reset the DVR settings to their out-of-box state. You can choose to reset all settings at once, or just settings on specific menus. Restoring
default settings will not delete recordings and snapshots saved to the hard drive.
To restore default settings:

- Under Advanced, click Maintenance to open the Maintenance tab.
- Click Load Default.
-
Select the menus you would like to restore to default settings:
![Graphic]()
- Click All to select all menus.
- Click Clear to deselect all menus.
- Click Save to confirm. The DVR will reboot automatically.

12.6.3 Exporting System Settings
You can export the main menu settings you have configured to a USB flash drive (not included). Exporting system settings lets
you to quickly apply your settings to another DVR.
Prerequisites:
- You must connect a USB flash drive to one of the DVR’s USB ports..
To export system settings:

- Under Advanced, click Maintenance to open the Maintenance tab.
- Click Save Settings.
-
The drive menu appears and displays the contents of the USB flash drive. Navigate to the folder you want the system settings
file to be saved in, then click OK to begin. The progress bar at the bottom of the window shows you the progress of the backup.
![Graphic]()
12.6.4 Importing System Settings
Once you have created a system settings export (see
12.6.3 Exporting System Settings
for details), you can import the settings on another DVR.
Prerequisites:
- You must connect a USB flash drive to one of the DVR’s USB ports.
- The connected USB flash drive must have a system settings file saved on it. See 12.6.3 Exporting System Settings for full instructions on saving settings to a USB flash drive.
To import system settings:

- Under Advanced, click Maintenance to open the Maintenance tab.
- Click Load Settings.
-
The drive menu appears and displays the contents of the USB flash drive.
- Navigate to the system settings file you want to import, then click OK to begin.
- A warning message appears to inform you the system will reboot in order to properly import your saved settings. Click OK to proceed.
12.6.5 Configuring System Warning Settings
Set preferences for system warnings including video loss, hard drive errors, and warnings when the hard drive is full.
To configure system warning settings:

- Under Advanced, click Events to open the Events tab.
- Use the dropdown next to Event Type to select the system warning you would like to configure.
- Check Enable to enable the selected event type.
- Check Show Message to show a message on DVR’s the on-screen display.
- Check Send Email to send an email notification.
- Use the dropdown next to Buzzer to have the DVR make an alarm sound when the selected system warning occurs, or select OFF to have the DVR remain silent.
- Click Save.
- (OPTIONAL) Use the Copy function to copy your settings to another or all system warning types.
12.6.6 Using Automatic Firmware Upgrade
The system supports automatic firmware upgrades when connected to a router or switch on your network using the included Ethernet
cable. When a new firmware version becomes available, the system is set to automatically download the firmware file from the
Internet and displays a pop-up on the DVR’s on-screen display.
If your DVR has been disconnected from the Internet for a while, you can push the system to check for any firmware upgrades it may have
missed.
Prerequisites:
- Your DVR must be connected to your router or a switch on your network using the included Ethernet cable so the system can access the Internet.
To check for new firmware:

- Under Advanced, click Auto Upgrade to open the Auto Upgrade tab.
-
Click Check FW to search for newer firmware. If a newer version is available, a notification appears asking if you want to upgrade the firmware.
![Graphic]()
- Click OK to upgrade. The system will restart.
